With Zabbix 7.0 we got Zabbix High Availability proxies (ZBXNEXT-8758), and they provide greatly improved availability and scalability for your monitoring. Zabbix proxies handle a lot of the same functionality that the server, and from a performance point of view they do pre-processing for the server and only send the values forward to the server itself. Thus we free up resources on the server to handle triggers, escalations alerts and so on. More about proxies on the Zabbix manual here (Zabbix Proxy).
What was also added with 7.0 was Proxy modes, meaning proxies can leverage Memory to process and send data instead of the database. This reduces disk I/O and improves performance. In Hybrid mode, the database is still used to store data if needed.
Deploying Zabbix Proxies as a docker container is beneficial for maintenance, and as data stored in a proxy is temporary it doesn’t matter if you lose the database or proxy. Thus deploying Zabbix proxy as a container starts making quite a lot of sense.
Deploying Zabbix proxy in a docker container
I’m building this guide based on Portainer that I use to manage my own containers at home (Link to homelab licensing below).
First we need to create a new stack using a docker compose yaml configuration. In the docker compose example below, I’ve defined the following things to create a proxy server with TLS Pre-Shared-Key encryption to my Zabbix Server. You can leave the PSK stuff out if you don’t need it, but I would recommend it as it’s really simple to set up. For the database I’ve chosen MariaDB 11.4, which is an LTS version and recommended for Zabbix MariaDB database version (here).
I’ve chosen alpine based image as it’s small and lightweight. I’ve also set up some basic configuration regarding the amount of poller processes to be started. A detailed list can be found on the Zabbix Proxy docker container page. The more interesting things are regarding PSK encryption, as need need to define a persistent volume and map the correct folder path of /var/lib/zabbix/enc. The Proxymode of “0” starts the proxy in Active mode.
Remember to change ZBX_HOSTNAME and ZBX_TLSPSKIDENTITY depending on how many you deploy, and take note of the values you enter for each proxy including the generated PSK key for when you enter the proxies on your Zabbix server.
The stack also includes the Zabbix Agent, so remember to change the environment values there as well.
---
version: "3"
services:
  zbx-proxy:
    image: zabbix/zabbix-proxy-mysql:alpine-7.0-latest
    environment:
      DB_SERVER_HOST: zbx-proxy-mysql
      MYSQL_USER: zbx
      MYSQL_PASSWORD: zbx-rw
      ZBX_PROXYMODE: 0
      ZBX_HOSTNAME: zbx-proxy.domain.tld
      ZBX_SERVER_HOST: your-zabbix-server.domain.tld
      ZBX_STARTPOLLERS: 10
      ZBX_STARTPOLLERSUNREACHABLE: 5
      ZBX_STARTPINGERS: 5
      ZBX_STARTDISCOVERERS: 2
      ZBX_CACHESIZE: 32M
      ZBX_HISTORYCACHESIZE: 128M
      ZBX_TLSPSKIDENTITY: zbx-proxy
      ZBX_TLSPSKFILE: /var/lib/zabbix/enc/zbx-psk.key
      ZBX_TLSCONNECT: psk
      ZBX_TLSACCEPT: psk
    volumes:
      - zbx-proxy-encryption:/var/lib/zabbix/enc
    ports:
      - 10051:10051
    networks:
      zbxbr:
        ipv4_address: 172.31.0.2
    depends_on:
      - zbx-proxy-mysql
    restart: unless-stopped

  zbx-proxy-mysql:
    image: mariadb:11.4
    restart: always
    environment:
      MARIADB_ROOT_PASSWORD: A#RandomPassword!1
      MYSQL_DATABASE: zabbix_proxy
      MYSQL_USER: zbx
      MYSQL_PASSWORD: zbx-rw
    volumes:
      - zbx-proxy-mysql:/config/databases/
    ports:
      - 3306:3306
    networks:
      zbxbr:
        ipv4_address: 172.31.0.3

  zbx-proxy-agent:
    image: zabbix/zabbix-agent:alpine-7.0-latest
    restart: always
    environment:
      ZBX_HOSTNAME: zbx-proxy.domain.tld
      ZBX_PASSIVESERVERS: 172.31.0.2
      ZBX_SERVER_HOST: 172.31.0.2
    networks:
      zbxbr:
        ipv4_address: 172.31.0.4

volumes:
  zbx-proxy-mysql:
  zbx-proxy-encryption:

networks:
  zbxbr:
    driver: bridge
    ipam:
      config:
        - subnet: 172.31.0.0/29
gateway: 172.31.0.1Note: You can use ENV variables for the configuration if required. I prefer to specify the network details (Passive Checks require Agent IPv4-address) to keep the configuration consistent. A dedicated small bridged network makes it easier.
Once you’ve started the proxy once, the volume will be created and you can add your PSK key file to the volume. During first start-up the docker container will fail as there isn’t a key file to be found. To add a key, run the following commands;
user@docker:/home/user# openssl rand -hex 32 > /var/lib/docker/volumes/zbx_proxy_zbx-proxy-encryption/_data/zbx-psk.key

user@docker:/home/user# cat /var/lib/docker/volumes/zbx_proxy_zbx-proxy-encryption/_data/zbx-psk.key
6624bdab74a973396a8ef312a4760a661ad2b553e5fd965bb87562e0d6815184
Note: Your docker volume location may differ from mine. To locate the docker volume file location, you can check your portainer container configuration or use the following command line commands;
user@docker:/home/user# docker volume ls
DRIVER    VOLUME NAME
local     zbx_proxy_zbx-proxy-encryption
local     zbx_proxy_zbx-proxy-mysql
user@docker:/home/user# docker inspect zbx_proxy_zbx-proxy-encryption
[
    {
        "CreatedAt": "2023-12-17T14:51:57+02:00",
        "Driver": "local",
        "Labels": {
            "com.docker.compose.project": "zbx_proxy",
            "com.docker.compose.version": "2.20.2",
            "com.docker.compose.volume": "zbx-proxy-encryption"
        },
        "Mountpoint": "/var/lib/docker/volumes/zbx_proxy_zbx-proxy-encryption/_data",
        "Name": "zbx_proxy_zbx-proxy-encryption",
        "Options": null,
        "Scope": "local"
    }
]
Restart the Zabbix Proxy stack to reload the proxy with the generated TLS PSK key.
ref: zabbix/zabbix-proxy-mysql – Docker Image | Docker Hub
Creating Zabbix proxies on the server
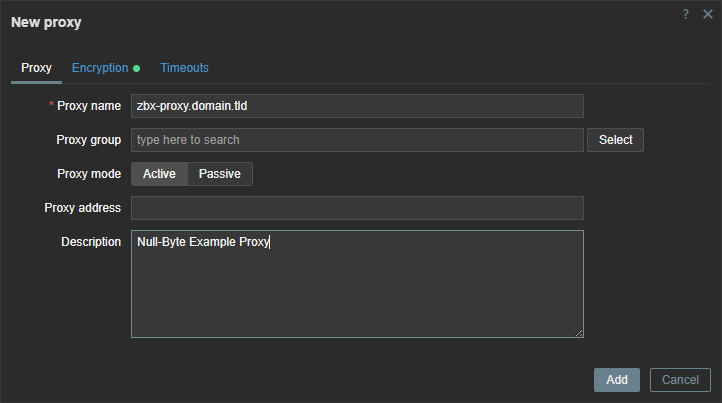
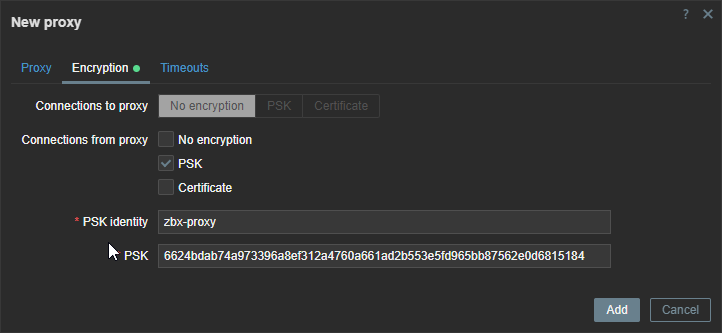
In your Zabbix Server user interface, go to Administration -> Proxies and click Create Proxy for the top right corner. Enter your proxy details as following;
| Setting | Value |
| Proxy Name | ZBX_HOSTNAME |
| Connections from proxy | PSK (De-select “No Encryption“) |
| PSK Identity | ZBX_TLSPSKIDENTITY |
| PSK | Contents of zbx-psk.key file |


If everything went correctly, you should see your proxy as Online with a green box for PSK for encryption. If not, check your proxy and servers logs.
user@zbx-server:/home/user# tail -fn 200 /var/log/zabbix/zabbix_server.log

or

user@docker:/home/user# docker ps #Copy your Zabbix Proxy docker container ID
user@docker:/home/user# docker logs CONTAINERID
Configuring Proxy HA
To create a Proxy High Availability configuration from the proxies you’ve deployed, you need to create a proxy group. This is done in Administration -> Proxy Groups. Create a new proxy group and give it a name, in my case “zbx-proxy-home“. Once the proxy group has been created, go back to Administration -> Proxies, and edit the proxy servers you have. Add them to the “zbx-proxy-home” group, and specify the proxy address and port. Assuming you have all containers on different docker hosts, you can use the default port of 10051 and the IPv4-address of the docker host.


Configuring Zabbix Agents for Proxy HA
Last step is to configure your agents to communicate with the Proxy Group, and thus need to update your agent Server= and ServerActive= values.
| Configuration | Value |
| Server= | All proxies of the group (separated by a comma) |
| ServerActive= | All proxies of the group (separated by a semicolon) |
Restart the Zabbix agent to apply the configuration. Note that Server= is required for passive item checks, while ServerActive= is required for Active item checks. Zabbix agent verison 7.0 is required for Proxy HA to work as intended (Zabbix Manual).
You will need to update monitored hosts to utilize the proxy group.

Monitoring your Zabbix Proxies
To monitor the proxies we have our Zabbix Agents. They have a specified IPv4 address for the agent interface. The biggest difference is that you won’t add the stacks agents to be monitored by the proxy group, rather you specify them to be monitored by the proxy itself. Remember to add the “Zabbix Agent” and “Zabbix proxy health” template (And update the template manually when upgrading your Zabbix major version).

Once the hosts have been added, it will look something like the screenshot above. And you will get data about the individual proxies in the proxy group like the screenshot below.

In real life your going to be interested in your proxy health, like the configuration cache utilization. You can even see proxy configuration cache change as Zabbix will switch hosts to be monitored between the proxies in the group 😸

Upgrading Proxy HA
There isn’t anything special to upgrading a proxy group. Make sure you run the same version of proxies. Note that if there’s a major version upgrade like from version 7.0 to 7.2, the proxies will work for data collection but any new configuration will not be applied. This also applies to load balancing between the proxies. Any proxy HA node reboot or node failure will mean that the remaining nodes will NOT receive a configuration update to monitor any new hosts handled by a node that is unavailable.


Resources
- Zabbix at Docker Hub: zabbix/zabbix-proxy-mysql – Docker Image | Docker Hub
- MariaDB at Docker Hub: mariadb – Official Image | Docker Hub
- Zabbix Manual: Zabbix Proxy (4)
- Portainer homelab licensing: Free Portainer Business at home – Using docker with more features in homelab! – Null Byte
